
Both microgreens and sprouts have enjoyed renewed popularity in recent years due to their use in fine dining and local food movements, but many people can’t tell the two vegetables apart.
So what’s the difference between microgreens and sprouts? Sprouts and microgreens origin the same type of seeds. Sprouts are seeds that have just begun to grow and still have their cotyledons (or “seed leaves”) while microgreens are harvested just after their first true leaves have formed. Both are nutritious vegetables, but microgreens tend to last longer after harvest and pose less risk of food poisoning.
Growing microgreens and sprouts can be a rewarding experience no matter which way you decide to go. Keep reading to learn more about microgreens and sprouts and the difference between the two.
What Are Sprouts?
Sprouts may be a type of food that is associated with health food stores, but these amazing plants can be grown at home and provide health benefits for everyone. Simply put, sprouts are very young plants that have not yet begun to grow their true leaves yet. A sprout is produced when a seed starts growing into a vegetable.
Sprouts are considered a very healthy food source because they have a high level of nutrients in a tiny package. Here are some of the benefits associated with them:
Good for digestion: Sprouts are good for digestion because they contain high amounts of living enzymes. These enzymes are shown to be antioxidant in nature and can even help inhibit the growth of certain cancers. Sprouts also aid in digestion because they contain large amounts of dietary fiber, which most people don’t get enough of in their daily diet.
High levels of vitamins: Sprouts contain high levels of vitamins and minerals such as copper, zinc, calcium, selenium, potassium, and many more. Since few people get their recommended dose of daily vitamins, including sprouts in your day to day dishes can greatly improve your diet.
Can help with losing weight: For those who are trying to shed a few pounds, eating sprouts can help to aid in that goal. Because they are high in fiber sprouts are very filling while providing more nutrients than other diet foods such as rice cakes.
Can boost immunity: Since sprouts contain high levels of vitamins C, B6, and A, they are a good choice for supplementing your diet if you’re trying to keep your immune system strong. These vitamins (particularly vitamin C) are crucial for a strong immune system.
Can be grown quickly: One of the major advantages of sprouts is that they can be grown in a matter of days, which means it is easy for people to grow large amounts of them in a short amount of time. A person can create their own supply of sprouts for personal consumption easily, though growing them for mass consumption can be risky due to foodborne illness.
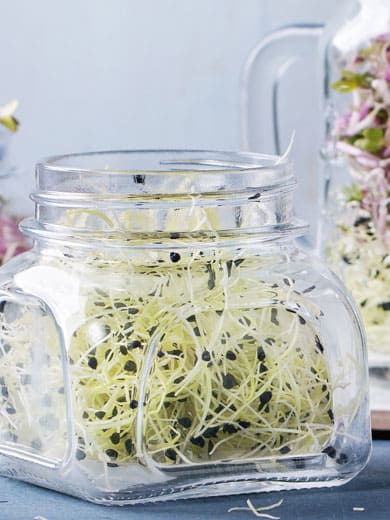
Sprouts are usually grown in a hydroponic (soil-less) system in order to remove the threat of soil contamination and because sprouts only take 3-5 days to grow until harvest.
The major downside of sprouts is that sprouts have commonly been linked to outbreaks of food poisoning. Raw sprouts are considered one of the most common sources of foodborne illness according to the CDC. This is because the same moist, humid conditions that are ideal for growing sprouts are also ideal for growing harmful bacteria such as Salmonella, E. coli, or Listeria.
The best way to prevent foodborne illness when eating and preparing sprouts is to make sure that all sprouts are washed thoroughly before use, and preferably cooked. Cooking sprouts kills dangerous bacteria and removes the chance of foodborne illness associated with them, but largely leaves their nutritional profile intact.
What Are Microgreens?
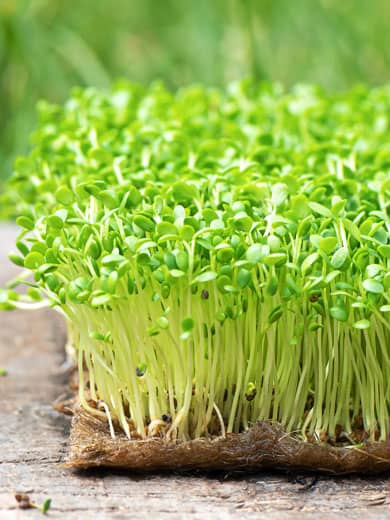
As opposed to sprouts, microgreens are seedlings that have been allowed to grow and progress to the point that they develop true leaves rather than just seed leaves. While this means that microgreens have to be grown for longer periods than sprouts, it also means that microgreens end up containing more nutrients and dietary fiber than their younger counterparts.
Here are some of the advantages of eating and growing microgreens:
Safer than sprouts: Microgreens pose a much smaller risk of foodborne illness than sprouts due to the differences in their growing conditions. Microgreens are grown with more ventilation and less humidity, which gives harmful bacteria less of a chance to spread.
Higher in nutrients: Like sprouts, microgreens are very high in nutrients since the plant is expending all its energy and nutrients into growing leaves. That means when people eat those leaves, they get the full benefit of that nutrient boost.
More tasty: While many people may turn their nose up at eating sprouts due to their taste or texture, eating microgreens is basically just eating really young, tender salad greens. This makes them a more tasty choice for picky eaters who don’t enjoy the squishy crunch of sprouts in their food.
More versatile: Microgreens can be used in many of the same recipes that normal salad greens would be used in, while sprouts are typically used in specialized recipes. Microgreens can be served either cooked or raw with little chance of foodborne illness as long as they are properly washed like any other salad greens.
Aesthetically-pleasing: Sprouts are used in dishes more for their crunch and texture than they are for their looks, but microgreens come in a wide variety of appealing colors and textures that can enhance almost any dish. This is one of the reasons microgreens have become so popular among chefs as a garnish for everything from soups to roasted meats.
More flavor: Sprouts are considered very mild-tasting and don’t really do much for the flavor of a dish, while many kinds of microgreens (such as arugula) can add a spicy note or flavorful note to various cuisines.
While they may take a little bit longer to grow than sprouts and the growing conditions are a little more strict (unlike sprouts, you can’t just throw a bunch of microgreen seeds in a jar with water) the benefits of microgreens make them well worth the effort to grow.
Here you can read more about what microgreens are, nutrition and health benefits.
What Kind of Vegetables Can Be Grown as Sprouts?
Many different kinds of vegetables can be grown for use as sprouts. The most popular types of vegetables used for sprouts include the following:
Broccoli: Broccoli sprouts are particularly known as a source of sulforaphane, a living enzyme or bioactive compound that has been researched for its benefits in autism therapy, cardiovascular health, geriatrics, and immune defense.
Clover: Clover sprouts are similar to alfalfa sprouts in texture and provide many essential minerals such as calcium and iron.
Alfalfa: Alfalfa sprouts are one of the most commonly known sprouts and can often be found as a garnish on sandwiches. These sprouts are high in vitamins K and vitamin C.
Mung bean: Mung bean sprouts are a slightly sweet sprout that is known in hot Asian countries as a remedy for heatstroke. While this is anecdotal, mung beans are known for having antioxidant properties.
Wheat: Wheat sprouts are a good source of amino acids as well as vitamins A, B, C, and E. Wheat sprouts are also a source of protein and are high in fiber.
Soybean: Soybean sprouts have been a popular form of protein in South Asian countries for hundreds of years. While soybeans are also eaten in bean form, sprouting has been shown to drastically improve the nutritional profile of them.
Mustard: Mustard sprouts have a strong flavor in comparison to many other types of sprouts, so it acts well as a sort of botanical condiment. These sprouts are a good source of phosphorus, manganese, calcium, magnesium, zinc, iron, and selenium.
Radish: Radish sprouts are a good source of folate and vitamin B6, both of which are known for being conducive to cardiovascular health. It is also shown to have benefits for weight loss.
Sunflower: Sunflower sprouts are known for being especially high in vitamin E, vitamin C, and selenium, all of which work together to reduce blood pressure. In Eastern medicine, sunflower is used as an expectorant to prevent respiratory illness.
Lentil: Lentils have always been a popular form of vegan protein for incorporation in vegetarian and vegan dishes, and lentil sprouts can act as a crunchy garnish for many different cuisines.
Pea shoots: Pea shoots are high in beta-carotene, which is converted by the body into vitamin A.
All these vegetables can be germinated easily without soil and each type provides a different set of minerals and vitamins. The fact that they grow so easily and in a small amount of space means that it’s simple to grow a wide variety of them to optimally improve your nutritional profile.
What Kind of Vegetables Can Be Grown as Microgreens?
Just as many different kinds of vegetables can be eaten as sprouts, there are just as many (or more) different kinds of vegetables that can be grown and eaten as microgreens. Since vegetables are at their most tender and brightly colored when they are young, eating regular garden vegetables as microgreens allows for a subtlety of flavor combined with a high nutrient punch.
Here are some of the vegetables that are commonly grown as microgreens:
- Amaranth
- Beets
- Broccoli
- Carrots
- Celery
- Dill
- Cucumbers
- Herbs such as mint, basil, and oregano
- Alliums like chives, garlic, leeks, and onions
- Lettuce
- Spinach
Basically, most edible vegetables that can be eaten as a full-grown vegetable can be eaten as a microgreen. These greens usually provide a more subtle version of the adult vegetable’s flavor but are more often used as a salad green or a garnish rather than as a vegetable side.
How to Grow Sprouts
Growing sprouts is so simple it is often used as a science experiment for small children. The first step in getting sprouts is to buy organic commercial seed that is marked specifically for sprouting. That way you can be sure that the seeds you are getting are edible and have not been treated either with an agricultural seed coating or any kind of pesticides.
Here are the other supplies you need to grow sprouts:
- A canning jar (any size you prefer)
- A canning ring
- A sprouting screen
When you have your sprouting seeds, the first step is to soak the seeds overnight. This softens the seed coat and prepares the seed for germination. Be sure to use dechlorinated water, as chlorine can inhibit a seed from germinating. Swirl and rinse the seeds in water to make sure they are clean of debris and chaff before covering with water and leaving them alone until morning.
For 3-5 days, depending on the growing period of the sprout in question, you will add fresh water to the jar several times a day, swirl it around, and then drain the water out.
Once the jar is drained, it should be left in a slightly downward-facing angle so that any excess water drains away from the sprouts. The goal is to prevent the sprouts from being saturated with moisture as this encourages spoilage and the growth of harmful bacteria.
After the sprouts begin to turn green, it is a sign that they are ready to consume. If the sprouts have grown to a desirable length, this is the point that they need to go in the refrigerator. After being refrigerated, sprouts can last for up to two weeks.
How to Harvest Sprouts
Harvesting sprouts is as easy as removing them from the sprouting jar. The sprouts should be fairly dry at this point, but any excess moisture can be wicked away by gently patting the sprouts dry with a paper towel before eating.
Sprouts can last up to two weeks in the refrigerator, but they should be inspected before use and thrown out if there are signs of spoilage. Two major signs that sprouts are going bad is that they will develop a brownish or rusty color or will begin to smell rancid. It is always better to consume sprouts as fresh as possible in order to avoid possible illness.
How to Use Sprouts
Once you have sprouts that are ready for use, they can be used in a variety of dishes. Here are a few popular ways to prepare sprouts:
- As a garnish on sandwiches or roasted meats
- As a soup topping
- Cooked into omelets or casseroles
- Added into stir-fries
- Incorporated into meatloaf or burgers
Most sprouts have a very mild taste, so it’s easy to incorporate them into various meals without really impacting the overall flavor profile of the meal too much. This makes sprouts a great way to incorporate more greens into your meals, especially for people who are bad about eating enough vegetables in their daily diet.
How to Grow Microgreens
Like sprouts, microgreens are another popular vegetable that can be easily grown indoors in either a hydroponic or soil-based system. Because they only take a week or two to grow to an edible size, they can be grown in compact spaces and with only the light from a window or (in the case of more light-needy greens) an LED grow light. LED grow lights installed under a kitchen cabinet is a convenient way to grow microgreens on your countertop throughout the year.
Here are the supplies you need to grow microgreens from seed in a soil-based system:
- Starter seed of your choosing
- Shallow growing tray (no drainage holes)
- Organic soil for the grow tray
- Warming mat (not necessary, but can greatly speed germination)
- Light source
To start your microgreens, you first need to pick a spot that is going to be your grow station. If you’re depending on natural light, you’ll want to position your grow tray where it will get direct light from a sunny window. However, if you don’t have much natural light, you’re going to need to invest in some kind of grow light. Fluorescent grow lights and LED grow lights are both good choices.
After your grow location is chosen, perform the following procedure to start your microgreens:
Fill the grow tray with soil and then sow your seeds across the top of the soil’s surface, lightly covering the tops of the seeds with soil or leaving uncovered. Each species of seed will have specific requirements for germination. For example, lettuce seeds are not typically covered with soil, while cucumber seeds are covered lightly.
Once your seeds are covered, gently mist the surface of the soil with water. It’s important that you use a spray bottle to wet the soil’s surface evenly rather than try to use a watering can, as the force of the water from a watering can will cause soil and seeds to be splattered around.
The time that it takes for the microgreens to grow will vary depending on which type of microgreens you decide to cultivate.
After germinating (which typically takes 2-3 days) it will take most microgreens another week to two weeks to be ready for harvest. Consult with the growing instructions for your specific type of microgreen to know the optimal time for harvest.
For your microgreens to grow vigorously, it’s important to make sure that the soil remains moist by misting a few times a day. It’s also important for your microgreens to receive enough light. It is also important that microgreens are placed in a location where they can receive ventilation since lack of ventilation can contribute to disease.
Since microgreens grow only very shallow root systems, there is no need for the drainage in a microgreen tray. If you are misting the soil rather than soaking it, the soil won’t become wet enough to waterlog the plants anyway.
How to Harvest Microgreens
Microgreens are extremely easy to harvest, which is why they are such a popular kitchen vegetable even for novice gardeners. Once your microgreens are large enough to harvest at between 7-14 days, you can either harvest the microgreens all at once and store in a sealed container without washing, or you can cut microgreens as you need them, leaving the rest to grow in the tray.
The prior method for harvesting microgreens is preferable for people who grow microgreens commercially for local culinary use since they are usually sold in bulk, but for those gardeners who are growing microgreens for personal consumption, cutting only as many microgreens as you need for a meal can extend the life of your microgreens.
To harvest microgreens, take a small pair of gardening scissors and clip the microgreens slightly above the level of the soil. If you are planning on cooking with or using the microgreens immediately, they should be washed thoroughly to remove any remnants of soil that might be clinging to them.
If you’re not planning on using them immediately, wash them, dry them and store them in the refrigerator to extend their shelf life. Once you wash your microgreens, either store them or use them immediately to prevent any spoilage.
RELATED: The Best Ways to Store Your Microgreens
How to Use Microgreens
There are as many uses for microgreens as there are for regular salad greens. Microgreens can be substituted in for shredded lettuce in tacos, can be cooked into soups or casseroles, or can be used as a colorful fresh garnish.
Another good way to use microgreens is to blend them into smoothies and juices. Because most microgreens have a mild or inoffensive taste, adding them to blended drinks can add a lot of vital nutrients to improve the drinker’s health.
New to microgreens and not sure how to use them? Here are some ideas to get you started:
- Add them as a fresh topping on a pizza
- Use them in place of lettuce on a sandwich or burger
- Incorporate them into pesto or other pasta sauces
- Add them to the wok in Asian style stir-fry dishes
- Toss several types of microgreens together for a vibrant salad
Most microgreens have very vibrant colors and textures, which makes them an aesthetically pleasing addition to almost any meal. Even if they are just used as an accompaniment such as a condiment or garnish, they can still add a level of complexity to many dishes.
Because microgreens are associated with high-end culinary dishes, adding them to your meals at home can be a nice way to add some sophistication and aesthetics to your dinner table along with the added nutrients from extra vegetables.
Need some more ideas for microgreen recipes? Here are some microgreen recipes at FoodGawker to get you started. There are tons of microgreen recipes across the Internet in all kinds of cuisines, so no matter what kind of palate you have you’re likely to find something that sounds delicious.
Other Advantages of Growing Sprouts and Microgreens
Despite their differences, there are many shared health advantages of eating sprouts and microgreens that you’ve grown yourself. However, besides their nutritional benefits, there are other good things associated with growing your own organic food. Here are some of the other benefits you can reap from growing sprouts and microgreens:
Gaining confidence in gardening as a hobby: If you’ve never tried to grow anything in your life, trying to grow sprouts or some microgreens is an easy introduction into the art of gardening. Once you’ve become addicted to the process of sowing and growing your own seeds, you’re likely to be tempted to start a full vegetable garden.
Getting to watch something grow in real-time: There is something incredibly satisfying about being able to watch a plant grow day by day (germination and all in the case of sprouts). For many people, this can be one of the only times that they’ve ever had the chance to witness germination firsthand rather than in an illustration, photograph, or video. If you have children, it is a fantastic opportunity to teach them about the principles of botanical growth.
They’ll put you in a better mood: It’s been shown in studies that having plants indoors increases productivity, boosts mood, and increases calm. There is nothing more cheerful in the spring than seeing a flat full of seedlings beginning to sprout. Sprouts and microgreens have the advantage of being available to grow year-round.
Food security: The more clean and organic food you can grow sustainably on your own, the less dependent you are on exterior forces to provide for yourself and your family. This can give many people a sense of peace and security. Activities such as growing your own vegetables often lead to other heritage skills such as food preservation and canning.
The smallest positive change can have a greater effect on your overall habits if it is maintained. Even though they are relatively small in the grand scheme of things, incorporating fresh vegetables like microgreens and sprouts into your diet can be a stepping-stone to an overall healthier lifestyle.
Growing Sprouts and Microgreens Is a Great Introduction to Gardening
If you’ve always found yourself intimidated by the prospect of growing either your own sprouts or microgreens, hopefully, the article above has illustrated that the process is actually quite simple as long as you have the necessary supplies and a little knowledge beforehand.
Once you are successful with growing sprouts and microgreens, there’s no telling what you could end up growing next.